Sunday, December 27, 2015

Collard Greens


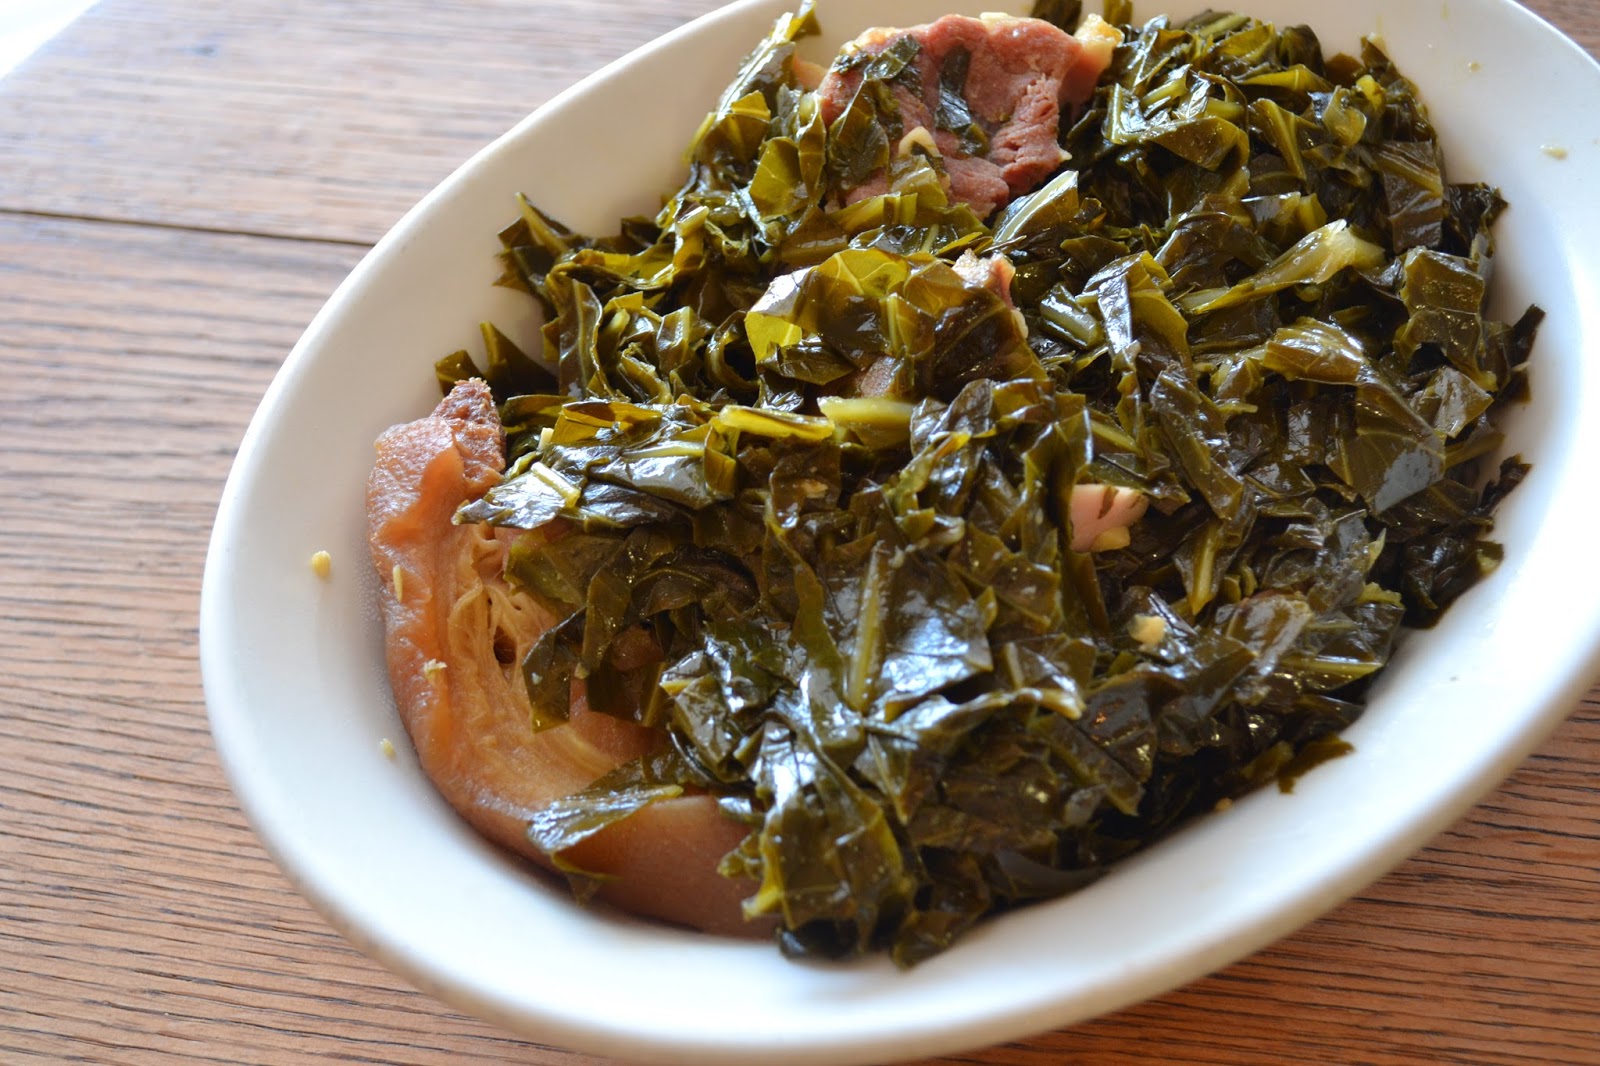
What's up foodies? Are y'all good? You good? You good? I'm good! You good? Okay, good. Today I'm sharing my recipe for collard greens. Now, when I was younger, I really didn't like collard greens or any other green vegetable for the matter, but it's one of those things that you grow out of.

There are several different ways you can make collard greens. What I do may differ from what others do.

Recipe:
- 1 large bunch fresh collard greens
- 2 or 3 pieces ham hocks  (or meat of choice)
- 2 cloves garlic, minced
- 4 cups chicken broth
- 1 tbsp. vinegar
- 1 tablespoon vinegar
- salt to taste

Directions:

Start by rinsing the entire outside of the greens and then start peeling the leaves apart and wash each leaf very thoroughly with cold water. Once all the greens are washed, start removing the leaves from the stem. You can do this by positioning your middle finger and thumb on each side of the greens and index finger down the stem and the run your middle finger and thumb down the greens (refer to video). Do this for all the greens.

After removing the greens, stack about 3 or 4 greens on top of each other and then roll them all together really tightly and start to slice the about 1/4 of an inch. When the greens are all cut, place them in a strainer and rinse the once again with cold water.

On medium heat, saute garlic for about one minute. Slowly add in the chicken broth and bring to a simmer. Add in the ham hocks or meat of choice and let that simmer, covered for about five minutes. Add in the collard greens, place the lid on and cook for 15 minutes. After fifteen minutes, add in the sugar and vinegar and season with salt and give it a stir. Replace lid and cook for another 15 minutes. Continue to stir the greens every 15 minutes for about 1 hour to 1 hour and 15 minutes or until the desired texture of the greens is reached. Adjust seasoning after the greens are finished.

If you prefer, you can remove the ham hocks and cut the meat off and add it into the greens.

Please remember to check out the video and don't forget to subscribe to my YouTube channel.


Tuesday, November 10, 2015

Lemon Pound Cake

Recipe By: Devin Judkins

Hello all my foodies out there. Are you good? You good? You good? I'm good! You good? Okay good. Today I am sharing my recipe for a homemade lemon pound cake. It's coming up on my 1 year YouTube anniversary of my cooking channel and I decided what better way to celebrate by sharing a different version of my first video I posted on my cooking channel, which was my regular all butter pound cake. Check that out here.

A few weeks ago, someone asked me if I could make them a lemon pound cake and so I said to myself "Why not film it and post it to my cooking channel?" because at the time I still hadn't figured out which of my recipes I wanted to share next. The person also wanted the cake in loaf form, which is why I made it like this.

Now, the cake that you see in the picture is just a small version of this recipe. When I made the cake, and took the pictures for this blog and for the thumbnail on my cooking channel, I didn't like them, so I made a smaller version to take new pictures. This recipe is for a FULL pound cake. I used a 16 inch loaf pan to make the original cake, but this can also be made in a regular bundt cake pan.

If you've made my regular pound cake, you will see that there isn't too much of a difference between that recipe and this one. I don't like to make recipes too complicated. I like to create a base recipe and add to it to enhance and improve it.

I have made this cake both in a bundt pan an obviously in the loaf pan, and there isn't really a difference in the cook time. I really hope you enjoy this recipe. I get lots of compliments on it. Happy baking.

Cake Ingredients
- 3 sticks unsalted butter, softened
- 3 cups sugar
- 6 eggs, (room temperature) [separated while cold]
- 1 tsp. vanilla extract (optional)
- 1 tsp lemon extract
- 1/2 cup fresh lemon juice
- 1 cup heavy cream, room temperature
- 1/2 tsp. baking powder
- 3 cups cake flour
- 1/2 tsp salt

For the glaze
- 1 cup powdered sugar
- 2 tsp. lemon juice
- 1 to 2 tablespoons milk

Directions:
Preheat oven to 325 degrees. In the bowl of your mixer, beat the butter and sugar until fluffy and combined. Next, add in the egg yolks one at a time mixing only until the yolk is mixed into the batter. Add in the vanilla extract, lemon extract, and lemon juice and mix well. Mix together the flour, salt, and baking powder in a bowl and then alternate adding the flour and the heavy cream. Start with the flour, and end with the flour. Place the egg whites in a bowl and with your mixer on high speed, beat the egg whites until they form stiff peaks. Gently fold the egg whites into the cake batter. Pour the batter into prepared pan and smooth it out evenly. Bake in preheated over for 1 hour to 1 hour and 15 minutes or until a skewer inserted in the middle comes out clean. When the cake comes out of the oven. Let it cool in the pan for 15 to 20 minutes and then run a butter knife around the sides to loosen it up and then flip the cake out onto a cooling rack to cool completely. Mix the ingredients for the glaze and spread it over the cooled cake.

Friday, October 16, 2015

Chocolate Rice Krispies Treats

What's up foodies? Are you doing good? You good? You good? I'm good! You good? Okay good. Today I'm posting something a little fun for Halloween. Chocolate Rice Krispies Treats. Now, this idea is something that I came up with a little while ago, but I decided to wait and save it until closer to Halloween.

This isn't too innovative, I'm pretty sure this has been done before, but I think its fun for Halloween. When I originally thought of these, I was wondering how I could get all the chocolate to cover the rice krispies cereal, and then I remembered that they sell cocoa krispies and my problem was solved. Now, if you don't have cocoa rice cereal in your area, I suggest that you take regular rice cereal, place them into a plastic bag and then spray the cereal with cooking spray and then pour in some sweetened cocoa and mix them all together. I haven't tried that, so I can't tell you how it will work, but it's worth a try. You can also just use regular rice cereal.

Notes:
- It's very important that you keep your stove heat on low to prevent burning the chocolate and the marshmallows.
- I melted and colored some white chocolate to spread on top of them when they were finished.

Recipe:
- 4 cups mini marshmallows
- 4 tbsp. butter
- 1/2 cup chocolate chips, melted (milk chocolate or semisweet chocolate)
- 5 cups cocoa krispies cereal
- 1 tsp vanilla extract
-1/4 cup mini chocolate chips (optional)

Directions:
In a pot over low heat, melt the butter. When the butter is melted, add the marshmallows and vanilla extract and stir until the marshmallows have melted. Add in the melted chocolate and mix it in until combined. When the chocolate is combined, remove the mixture from the heat and add the cocoa krispies cereal and stir really well to combine everything. If you choose, you can add the mini chocolate chips when you add the cereal. Once everything is well combined, pour the mixture into a greased 9x9 or 13x9 inch pan and pat down evenly using a greased rubber spatula or clean hands. Let the treats set to firm about 10 to 15 minutes and then slice and serve.

Friday, September 11, 2015

Strawberry Swirl Cheesecake


Recipe By: Devin Judkins

What's up foodies? Are you doing good? Okay, good. Well, today I am sharing my recipe for my all-time favorite dessert, Cheesecake. I really love cheesecake. I could eat it all day, everyday day. When I go to a restaurant and order dessert, you can bet if there is a cheesecake on the menu, I'm going to get it.


Now, my recipe doesn't stray too much from any other cheesecake recipes. This is a baked cheesecake, so you will have to cook it in the oven. Personally, I prefer a baked cheesecake over a no bake cheesecake because of the texture. I love the fluffy yet dense texture that you get from a baked cheesecake versus the creamy texture you get from a no bake cheesecake. I understand that not everyone likes a baked cheesecake, so I will be sharing a no bake cheesecake in the future.

Some people like to use either sour cream or heavy cream in cheesecake recipes. I like to use a combination of them both. It makes for a great texture.


Tip: If you are like me, you've had a problem with your cheesecake crust sticking to the pan. I saw on another website that if you add a piece of parchment paper into the bottom of the pan and then add your crust it will prevent the crust from sticking. I tried this out with this recipe and it works.

Notes:
- You can leave out the strawberry sauce and this makes a great plain cheesecake.
- You don't have to cook the cheesecake in a water bath, but it does help prevent cracks, if you choose not to use the water bath, you won't need the foil around the pan.
Recipe:

Crust:
- 1 1/2 cups cookie or graham cracker crumbs
- 5 tbsp. butter, melted and cooled
- 2 tbsp. sugar
- 1/4 tsp. cinnamon (optional)

Filling:
- 4 8-ounce packages cream cheese, softened
- 1 1/4 cups sugar
- 4 eggs, room temperature
- 1 cup sour cream
- 1/4 cup whipping cream or heavy cream
- 2 tsp. vanilla extract
- 1 tsp. lemon juice (optional)
- 1/4 cup flour
- 1/3 cup strawberry sauce get recipe
- Pot of boiling water

Directions:
Preheat oven to 350 degrees.

For the crust: Butter the bottom and sides of a 10 inch spring form pan and wrap the outside of the pan twice with aluminum foil. Crush the cookie or graham crackers using the food processor or by placing them into a plastic bag and crushing them with a rolling pin or can of vegetables. Place the cookie crumbs into a bowl and add the melted butter, sugar, and cinnamon if you choose and stir until combined. Pour the crust mixture into the pan and press the crust into the bottom of the pan using your hands or a cup until flat and even. Place the crust in the refrigerator while you make the filling. 

For the filling: Beat the cream cheese just until it loosens up a little and then mix in the sugar until all combined. Add the vanilla and lemon juice and mix. Remember to scrape the sides of the bowl. Next, add in the eggs one at a time, mixing only until each egg is combined. Add the heavy cream and sour cream and mix until combined. Add in the flour and mix. After the flour is mixed in, give the bowl a good stir to make sure everything is combined. Pour the batter over the crust and smooth out. Place teaspoons of the strawberry sauce all over the top of the cheesecake. Using a butter knife, make swirls through the batter. Place the cheesecake into a roasting pan and carefully pour the boiling water into the roasting pan. You want enough water to come up about half way of the spring form pan. Bake for 50 minuter or 1 hour and 10 minutes, keeping a check on it. When the cheesecake is done, the outer layer ring of the cheesecake should be firm, but the center should have a little jiggle to it. Let the cheesecake cool completely on the counter (1 1/2 to 2 hours) and then place in the refrigerator for overnight to set.


Saturday, September 5, 2015

Slow Cooker Strawberry Sauce

Recipe By: Devin Judkins

Ingredients:
- 1 pound fresh strawberries
- 1/4 cup sugar
- 2 tsp. cornstarch
- 1 tbsp. plus 1 tsp water
- juice of half a lemon
- splash of vanilla extract (1/4 tsp.) [optional]

Directions:

Wash strawberries really well with cold water. Remove the tops of the strawberries and slice them. Place the strawberries into the slow cooker. Mix together the cornstarch and water. Add the sugar, cornstarch and water mixture, and the vanilla extract in with the strawberries and give them a stir. Put the slow cooker on low temperature and cook for 1 1/2 hours to 2 hours, stirring every 20 or 25 minutes. When the strawberries have cooked down and thickened, remove from the heat and let cool. Place the strawberries into the food processor and process until smooth. Run the sauce through a strainer to remove the strawberry seeds. Place in an airtight container into the refrigerator for about a week.

Notes:
- You can also do this on the stove in a saucepan, just make sure the stove is on low temperature. 

Saturday, August 22, 2015

(BLFGT) Bacon Lettuce and Fried Green Tomato Sandwich


I am almost afraid to post this because it isn't really a recipe.

Ingredients:
- 2 fried green tomatoes
- 2 slices of bacon (thick)
- Lettuce
- Sandwich bread
- Ranch dressing or mayo

Instructions:
Fry your green tomatoes. Get fried green tomatoes recipe here. Cook the bacon. When the tomatoes and bacon are done, assemble the sandwich. Spread a layer of ranch dressing or mayo on the bottom of the bread and then add the bacon lettuce and green tomatoes.


Saturday, August 8, 2015

Chewy Fudgy Brownies


Recipe By: Devin Judkins

Hello foodies, are you doing good today? Good. Today I want to share my recipe for chewy, fudgy brownies. I like to call them that because to me, they are the perfect mix between a chewy brownie and a fudgy brownie. 


Now, it took me a while to get the recipe exactly how I wanted it, but I finally got them right. These use a combination of brown sugar, white sugar, semisweet chocolate, and a little cocoa powder for extra chocolate flavor.

Please give these brownies a try and let me know what you think.

Notes: 
- If you don't have a heat safe bowl or don't want to use the simmering water method, you can place the butter and chocolate in a sauce pan on LOW heat and melt the two, stirring constantly. 

- You can also place the chocolate and butter into a bowl and melt in the microwave, make sire to stop and stir the two every 15 seconds to prevent burning the chocolate. (You also may want to cover the bowl just in case the butter splatters).

- I used a 9x9 inch pan for this recipe and my brownies cooked in exactly 20 minutes. If you're using an 8x8 inch pan, you're going to have to cook the for about 30 or 35 minutes, but check on them at 30 minutes.

- You may want to add some parchment paper into your pan for easy removal of the brownies.

Recipe:

Ingredients:
- 4 ounces semisweet chocolate
- 1 stick butter
- 3/4 cup white sugarr
- 1/2 cup brown sugar
- 2 eggs
- 1/2 cup plus 3 tbsp. all purpose flour
- 1/4 tsp. salt
- 2 tsp. vanilla extract
- 3 Tbsp. cocoa powder
- 1 tsp. baking powder

Instructions:
Preheat oven to 350 degrees. Place a heat safe bowl over a pot of simmering water (make sure the water in the pot is NOT touching the bottom of the bowl) and add in your chocolate and butter and melt the two, stirring constantly (see notes for alternate method). After the butter and chocolate is melted, remove it from the heat and let the mixture cool for five minutes. Add in the sugars and stir until combined. Add in the eggs and the vanilla and stir. Sift together the flour, cocoa, salt, and baking powder in a separate bowl. Add the flour mixture into the chocolate mixture and mix only until the flour is worked into the batter. Butter a 9x9 inch baking pan (see notes for 8x8 inch pan) and spread the batter evenly into the pan. Bake in the preheated oven for 20 minutes. Let the brownies cool completely and then cut and serve.

Check out the video for this recipe below. I hope you enjoy.


Friday, July 17, 2015

Fried Green Tomatoes


Hello fellow foodies. Are you doing good? I'm great because today I'm sharing my recipes for one of my favorite healthy recipes. Okay, so FRIED green tomatoes aren't that good for you, but they are good to me. 

I just love a fried green tomato. It's something about that crispy crust and then that nice little tang that you get from the green tomato. I also love a nice, thick crust on my green tomatoes, and my recipe does exactly that. I'm not going jabber to much on this post because I just know you are so eager to this recipe, so please enjoy.

RECIPE:
- 2-4 Green Tomatoes
- 1 cup cornmeal
- 2 tsp garlic powder
- 1/2 cup flour
- 1/2 cup buttermilk
- 1 egg
- salt
- pepper
- vegetable oil for frying

Pour enough oil into a skillet so that it comes up about half way of the skillet and bring to a medium heat. Slice the tomatoes about 1/4 inch. Season the tomatoes really good with salt and pepper on both sides. In a bowl, beat together the egg and the milk and set aside. In another bowl, mix the cornmeal and garlic powder together. Did the tomatoes into the flour, coat, and then into the egg mixture. Once the tomato is covered in the egg mixture, place it into the cornmeal and coat. Place the tomatoes into the preheated oil and fry for 3-4 minutes or until golden brown on each side (make sure not to overcrowd the pan). Once the tomatoes are done, remove them from the oil and place on a paper towel lined plate.


Sunday, June 21, 2015

Homemade Peach Cobbler

Homemade Peach Cobbler

Recipe By: Devin Judkins

What's up world? Y'all going good? You good? You good? I'm good! You good? Okay, good. So, I love a good peach cobbler, and since peaches are in season and they have been on sale a lot, I decided it was time to share my recipe with you all. Now, every other time I've made my peach cobbler, I've always used canned peaches, but since the peaches were in season, I decided to used fresh peaches.

Now, I will admit that I know nothing about picking good produce. I can never tell if it's too ripe, not ripe enough, or just right, which is why the video for this recipe was not posted sooner. When I first decided to record my recipe for YouTube (about three weeks ago) I purchases peaches that were too ripe, so I had to stop filming. The second time I tried to film it, I purchased peaches that weren't ripe enough, so I had to stop production on that video as well. Fast forward to this past week, I got some perfect peaches and I was so happy.

For this recipe, I tried something new, I decided to blanch the peaches, which is basically, you place them in boiling water and boil them for about 45 seconds to 1 minute, and then quickly remove them from the boiling water and place them into a bowl of ice water to stop the cooking process. Doing this will help the skin come off of the peaches much better than just peeling them, but you can also just peel them if you want. I was quite surprised how easy the skins came off.


Note: If the peaches you are using are large, you might only need five or six. Mine were kind of small, so I used eight. 

Recipe:

For the filling:
- 6 to 8 ripe peaches
- 1 cup sugar
- 1 cup water
- 1 tsp. vanilla extract
- 1/2 tsp. cinnamon
- 1/8 tsp. nutmeg (optional)
- 1 tsp cornstarch
- 1 tbsp. water
 For the topping/crust:
- 1 cup self-rising flour
- 1 stick butter, melted
- 3/4 cup sugar
- 3/4 cup buttermilk
- 1/4 tsp cinnamon (optional)

Preheat oven to 375 degrees.
For the filling:
Place the peaches into a pot of boiling water and boil for 45 seconds to 1 minute. Remove the peaches and place them into a bowl of ice water and let them sit in the ice water for about 3-4 minutes. Peel the skins from the peaches and then slice them. Place the sliced peaches into a boiler over medium heat with the water, cinnamon, nutmeg, and vanilla. Stir all those together and bring to a boil. Boil for about 10 minutes. Mix the 1 tablespoon water and the cornstarch together and pour that mixture into the peaches. Stir in the cornstarch mixture and cook for about three minutes until it thickens up. Remove the boiler from the heat.

For the topping/crust:
Mix together the flour, sugar, and cinnamon (if you use it). Add the melted butter, and pour in the buttermilk while stirring to prevent lumps. 

Pour the peaches into a lightly greased baking dish and pour the batter over the peaches. Bake for 35-40 minutes or until golden brown. When the cobbler is done, remove it from the oven and let it cool for about 15 minutes and then serve.

I really hope you enjoy this recipe, please watch the YouTube video for this recipe, and subscribe to my cooking channel on YouTube (Devin Cooks). I'll see you next time.


Friday, May 15, 2015

Sweet and Spicy Chicken Wings

What's up foodies? Are you doing good? I'm good? Are you good? Okay, good. Well, I love a good chicken wing and these wings are delicious. The other day on may way to class, I decided that I wanted to make chicken wings for lunch. I remembered having the sweet and spicy wings from Zaxby's before and I wanted to make my own version of sweet and spicy wings.

A combination of red chili pepper, ginger, honey, and orange juice give things wings a sweet taste, and a kick at the end. The first time I made these, I used sriracha hot sauce to give me the 'spicy' element in the sauce. The wings tasted just as good with sriracha, but I didn't want the flavor in the wings. You are more than welcome to substitute sriracha for the red chili paste, but you might want to use a little less than the red chili paste because the sriracha hot sauce is very spicy.

If you feel the sauce isn't enough, you can double the recipe.

Ingredients:
- 2 pounds chicken wings
- 1/2 cup fresh orange juice
- 1 tsp. minced ginger
- 2 tbsp. honey
- 1 tsp. soy sauce
- 1 tbsp. plus 1 tsp. red chili paste
- 1/4 tsp. cayenne pepper
- 1 tbsp. water
- 1 tsp. cornstarch
- salt and pepper to taste (optional)
- 1 1/4 cup flour
- vegetable oil for frying

Directions:
Mix the orange juice, ginger, honey, soy sauce, cayenne pepper, and red chili paste together in a bowl. Cut the wing tip off the chicken wings and separate the wing and the drummette. Place the wing portions into a bowl and season them with salt and pepper to taste (if you prefer). Coat the chicken wings with flour.

Pour enough oil into your fry pan so that it comes up about halfway up the sides. Bring the oil up to a medium heat. Place the wings into the oil and cook for about 4 to 5 minutes  on both sides or until full cooked. When the chicken wings are done, remove them from the oil and place them onto a plate lined with paper towel.

Mix the water and cornstarch together and then add the mixture to the sauce mixture. Place the sauce into a saucepan over medium heat and cook for about 3 to 4 minutes or until the sauce thickens up. Place the chicken wings into a bowl and toss them in the sauce.

Serve with french fries and ranch dressing.


Friday, April 17, 2015

7Up Pound Cake


What's up foodies? You going good? I'm good! You good? Okay, good. Today, I have another cake recipe that I have been working on. A few weeks ago, a friend of mine asked if I knew how to make a 7Up Pound Cake after watching my YouTube channel. Now, at the time, I didn't have my own recipe, but I told her yes, because it couldn't be too hard, and it wasn't (I did make it a few times to get it right).

My recipe is very basic and it doesn't stray much from any other recipes. Around here people love this type of cake, and I'm sure you'll love it too. Now, this is a pound cake, so it uses quite a few ingredients, but In the future, I plan on making a non-pound version of the cake. Now, you don't have to use 7Up in this cake, you can use whatever lemon lime soda you prefer. I gave it to my friend and she loved it. She said it was gone in two days. So, please give this recipe a try, and I hope you enjoy it.

Recipe:
- 3 sticks of softened butter
- 3 cups of sugar
- 3 cups all-purpose flour
- 2 tsp. vanilla extract
- 5 eggs (room temperature)
- 2 tbsp. lemon extract
- 1 1/4 cup 7Up soda (or any lemon lime soda you prefer) (room temperature)

For the glaze:
- 1 1/4 cups powdered sugar
- 2 tsp lemon juice
- 2 tbsp milk (plus more if needed)

For the cake:
Preheat oven to 325 degrees. Beat the butter and sugar together with your mixer until fluffy. With the mixer on low, add the eggs in one at a time. Add your vanilla and lemon extract to the soda, and the alternate adding the flour and the soda. Start with the flour and end with the flour. Once the flour and soda have been added, give your bowl a good stir to make sure everything is combined, and the pour your batter into a greased and floured bundt or tube pan. Bake for 1 hour to and 1 hour and 10 minutes, or until golden brown and a tooth pick inserted into the middle comes out clean.

For the glaze:
Mix all three ingredients in a bowl until it becomes a thick paste. Add more milk if needed.


Wednesday, March 18, 2015

Spicy Chicken Sandwich


What's up foodies? Y'all doing good? You good? You good? I'm good! You good? Okay, good. I've been so busy the past few weeks between school and work, so I haven't had the time to record any videos or post any recipes. I have, however, been working on recipes and this one is one of them. I love the spicy chicken sandwich from Wendy's, it's what I get every time I go there. The other day I decided that I wanted to make one for dinner. While my recipe may not taste just like Wendy's, it's just ask good.

This is a very simple sandwich and it tastes so good. The combination of cayenne pepper, chipotle pepper, and hot sauce give the sanwich the perfect amount of heat. For my hot sauce, I like to use Franks Red Hot Sauce because of its bold flavor, but you can use any hot sauce your prefer. 

Ingredients:
- 3 boneless, skinless chicken breasts
- 1 tsp. garlic powder
- 1 tsp. garlic salt
- 1 tsp. cayenne pepper
- 1/2 tsp. chipotle pepper
- 1/2 tsp black pepper
- 2/3 cups hot sauce (Franks Red Hot Preferred)
- 1 egg
- 2 cups all purpose flour
- Oil for frying

Wash the chicken in cold water and dry them with paper towel. If you have thick chicken breasts, cut them in half, lengthwise. In a small dish, mix the garlic powder, garlic salt, cayenne pepper, chipotle pepper, and black pepper together. Arrange the chicken breasts in a bowl or a dish and season both sides with half of the seasoning mixture.

 Mix together the hot sauce and the egg. Pour the hot sauce and egg mixture over the chicken breasts, making sure all sides are covered with hot sauce. Cover and marinate in the refrigerator for one hour. After marinating the chicken remove it from the refrigerator and let it come to room temperature for about 10-15 minutes. In a fry pan, pour enough oil so that it comes halfway up the pan.

 Set stove to a medium heat and bring to temperature. Mix the remaining seasoning and flour together in a dish. Batter each piece of chicken. Carefully add the chicken to the hot oil and fry for about 3-4 minutes on each side or until cooked through. Remove the chicken from the heat and place onto a paper towel line plate. 

Grab a bun, some lettuce and tomato and enjoy your sandwich. I mixed some of the Franks Red Hot sauce with some ranch dressing and spread the mixture over the buns.

I really hope you enjoyed this recipe. Remember to visit my YouTube channel for video recipes for this one and others. Thanks for visiting. See you next time.


Tuesday, February 10, 2015

Moist Red Velvet Cake


What's up, my fellow foodies? Y'all doing good? You good? You good? I'm good! You good? Okay, good. Valentine's day is almost here, I thought that now would be the perfect time to share my Red Velvet Cake recipe. Red velvet cake is one of my favorite kinds of cake. The deep red color, the moist cake, and the sweet cream cheese frosting make this dessert irresistible. 

This cake is very easy and simple to make. It's an oil-based cake, which is what I prefer for a red velvet cake. Using oil is what really gives this cake its moist texture. I really love red velvet cake, but I have found is that different people like to do theirs different ways. Some people tend to use WAY too much Cocoa in there red velvet cake, which is saddening to me. A red velvet cake is not a chocolate cake, it a red velvet cake that has been blessed with a little Cocoa for that little something special.


My recipe has the perfect amount of Cocoa in it that doesn't overpower the entire cake. I developed this recipe a little while ago, and everyone loves it. I really hope you give it a try.


For the cake:
- 2 1/2 cups cake flour
- 2 1/2 tbsp. unsweetened Cocoa
- 1 tsp. salt
- 2 cups vegetable or canola oil
- 2 cups sugar
- 2 eggs
- 1 1/2 tsp vanilla extract 
- 1 tsp. baking soda
- 1 tbsp. white vinegar
- 1 cup buttermilk
- 2 ounces red food coloring
- 1 cup chopped pecans (optional)

For the cream cheese frosting:
- 2 8-ounces packages cream cheese (softened)
- 2 sticks of butter (softened)
- 2 tsp. vanilla extract
- 4 cups powdered sugar

Directions for the cake:

Preheat oven to 350 degrees. In a bowl, sift together the flour, salt, and cocoa until completely combined. In a separate bowl, beat the sugar, oil, eggs, and vanilla together with your mixer until fully combined. Add in the red food coloring and mix until incorporated. Slowly add in the dry ingredients to the wet mixture in to additions, mixing only until combined. Scrap down the sides of the mixing bowl for any flour that has been mixed in. Add in the buttermilk. Lastly, mix the baking soda ans vinegar in a small dish and then quickly add that mixture into the cake batter and mix. Pour the batter into two greased and floured 9-inch cake pans and bake for 25-30 minutes or until a toothpick inserted comes out clean. Remove the cake from the oven after baking and let them cool in the pans for about 15 minutes. Using a butter knife, go around the edges of the cakes to release them from the sides and then flip them over on to a cooling rack to finish cooling. 

Directions for the frosting:

In a mixing bowl, beat the softened cream cheese and butter together until fluffy. Add in the vanilla extract and beat until combined. Slowly add in the powdered sugar one cup at a time until the sugar is completely mixed in, making sure to scrape down the sides of the bowl.

After the cakes have cooled, lay one layer upside down onto your cake plate, and spread on a layer of frosting on the top. Take the top layer of the cake, and place it upside down onto the frosted bottom layer. Spread the frosting evenly on the sides and top of the cakes. Stick the pecans all around the sides of the cake.

I really hope you enjoy this recipe. If you make it, please let me know how you liked it. Remember to watch my video to this recipe below, and subscribe to my channel YouTube channel (Devin Cooks) for more video recipes. Thanks, and I'll see you next time.


Wednesday, January 28, 2015

Buttery Homemade Biscuits


What's up foodies? Y'all doing good? You good? You good? I'm good! You good? Okay, good.

There's nothing like a good, flaky biscuits to go along with you morning breakfast! I loooove a good biscuit, and these biscuits are everything you need in a biscuit. I have been making these biscuits for quite some time now, and they are my favorite. It took me a while to perfect this recipe, but after some time, I finally got it right.

The secret is using Self-Rising flour. Before making these biscuits, I always used All-Purpose flour, but it wasn't until my mom suggested that I use Self-Rising flour that I finally decided to try it. My mom told me that self rising flour is better for biscuits because that's what she uses in her biscuits (which I may share the recipe for one day). If you can, I strongly recommend that you use White Lily self rising flour. White Lily is THE flour for making biscuits. I got go all into the science of why the White Lily brand is the best for making biscuits, but I'm here to share a recipe, not give a science lesson! But trust me, White Lily works. I understand that everyone isn't able to get White Lily, and if you can't, just use another high-quality flour.

Another secret to these biscuits is I like to use half and half instead of just regular milk. I find that the mix of cream and milk gives me a better taste and texture, but you most definitely can use regular whole milk, but watch the amount you use because half and half is a little thicker than regular milk.

Now, I know that I already have self rising flour in the biscuits, and it already has salt and baking powder in it, but I also like to add a little baking powder just to add little more 'rise' in the biscuits and a little salt for flavor.

NOTES: 
- Make sure that the butter is really cold, I put mine in the freezer for about 25 minutes to make sure it's really cold.
- I put my butter in the food processor with a few tablespoons of flour to make sure nothing stuck, and pulsed it a few times until the butter was cut into small pieces, and then added the butter in with the flour. You can also just make these biscuits it your food processor if you have one that big enough. 
- If you want to make layers in your biscuits, fold the dough over on itself a few times before cutting them (refer to the YouTube video below).

Ingredients:
- 2 1/2 cups self rising flour (White Lily recommended)
- 1 tsp. baking powder
- 1 tsp. salt
- 1 tbsp. sugar
- 1 stick ( 8 tablespoons) butter, very cold
- 1 cup half and half

Preheat oven to 425 degrees.

In a mixing bowl. sift together the flour, salt, baking powder, and sugar. Cut the cold butter into the flour with a pastry blender, fork, or two knives until its in small pieces. Next, make a well in the middle of the butter and flour mixture and pour in the half and half. Mix the half and half into the flour mixture until it forms a dough. Flour your counter top, and then turn the dough onto the floured surface. Knead the dough a few times to incorporate some of the flour, and then flatten it out with your hands or a rolling pin, and then cut the biscuits out with your floured biscuit butter. Place the biscuits into the pan of your choice, spread the tops with melted butter, and make for about 12-15 minutes in the preheated oven.

I really hope you enjoy this recipe, remember to visit my YouTube channel for the video recipe. If you make this, please let me know how you liked it. Thanks again, and I'll see you next time.

https://www.youtube.com/watch?v=4Gx9W0XFAkA

Monday, January 5, 2015

Cranberry Pecan Loaf Cake

Cranberry Pecan Loaf Cake

                                                        Cook time: 45-55 minutes 
                                                   Servings: Yield 15-20 servings 

What's up foodies? Y'all doing good? You good? You good? I'm good! You good? Okay, good.

Okay, this recipe is probably one of my favorite recipes because I pretty much nailed it with the recipes the first time I made it. This load cake is inspired from a cake that I once had from the bakery at a Publix grocery store. It was a few years ago when I was in a Publix in another city (we don't have one in my city). I went there and passed through the bakery section where this lady was standing there holding a tray with plastic cups. She asked "Would you like to try some of this cranberry pecan cake today?" I replied "No!" I really did want some, but I was being modest. I caught up with my mama and she had some of it to. I tried some of hers and was amazed at how good it was. I went back to the bakery section and bought two of these cakes. I went back maybe a couple months after that and was able to get one and have never had another one since. I first, I though maybe I was just coming at the wrong time. Then, I thought that maybe they only serve them around a specific time of year because of the cranberries being in season. But I soon realized that the cake contained dried cranberries, which can be purchased anytime of year. So, then I just came to the conclusion that maybe everybody didn't enjoy the cake as much as I did and they didn't sell well and so they decided to stop selling them. Either way, I am going to call them one of these days and just asked if they still sell them.

If we had a Publix where I live, I would most definitely check to see if they had them every day, but since the nearest one is about 45 minutes away, that's just not convenient. So, about two or three weeks ago, I decided to sit down and make my own recipe at home, and I think I did a pretty good job. This flavor in this cake is almost the same as the one I purchased from Publix.

In the recipe, you'll see that I use sour cream and half and half. I found that the sour cream really gives this cake a great moistness and I love the richness they half and half adds.

Notes:

-You don't have to make this in a loaf pan, the ones that I purchased from Publix were in loaf pans, I just wanted to get the full effect. You can make this in a 13x9 inch pan or a tube pan, but the cooking time is going to vary depending on the pan you use.

- If you don't have half and half, you can substitute it with regular milk. 


Ingredients:
- 12 tablespoons butter
- 1/4 cup brown sugar
- 1 cup white sugar
- 1 cup dried cranberries
- 1/2 cup chopped pecans
- Juice of one orange
- 1 teaspoon orange zest
- 2 eggs
- 1 teaspoon vanilla extract
- 1/2 cup sour cream
- 1 cup half and half
- 1 1/2 cups all-purpose flour
- 1 1/2 teaspoons baking powder
- pinch of salt 

Directions:
About one hour before you start making the cake, put the cranberries into a small bowl and add in the orange zest and the freshly squeezed orange juice and stir. Let the sit for an hour, allowing the juice to be absorbed by the cranberries.

Preheat oven to 325 degrees. Grease and flour 2- 9 inch loaf pans.

In a mixing bowl, beat the butter, brown sugar, and white sugar until fluffy and combined. Add the eggs in one at a time, beating until the egg is combined. Add in the vanilla extract. In a separate bowl, sift together the flour, baking powder, and salt. Alternate adding the flour and the sour cream and half and half. Once all the flour and half and half/sour cream is added, fold in the pecans and the cranberries that have been sitting in the orange juice. Pour your batter evenly into the two loaf pans and bake for about 45-55 minutes or until golden brown and a toothpick inserted into the middle comes out clean. After the cakes come out of the oven, let them cool for about 25 minutes before serving. 

I really hope you enjoy this recipe. I found it to be quite delicious. Make sure to visit my YouTube channel (https://www.youtube.com/channel/UCVS-VN3HMfEh1wr41rd7ImA) to view a video of this video and more. Thanks for visiting.